For people who have never used a MIDI sequencer. Follow the chapters in order and a short loop turns into a song. Open MIDI Studio in your browser and read along.
What MIDI is
MIDI is not sound. It is a set of performance instructions: which note to play, when, how hard and on which instrument. A sequencer records those instructions in order, and a sound engine reads them and makes the sound.
- A sound instruction is a note. It has a pitch (C4 and so on), a position, a length and a strength (velocity, 1–127).
- The instrument is chosen with a patch (Program Change): piano, bass, strings… the GM standard defines 128 of them.
- A track is one “row” per instrument. Each track talks to the sound engine on a channel (1–16); channel 10 is reserved for drums.
- The speed of the song is the tempo (BPM); beats are grouped by the time signature. Positions are written “bar . beat . tick”.
Because only the instructions are stored, you can change the patch or the tempo later and the performance stays intact. Files are small (tens of KB) and travel to other software as .mid.
Reading the screen
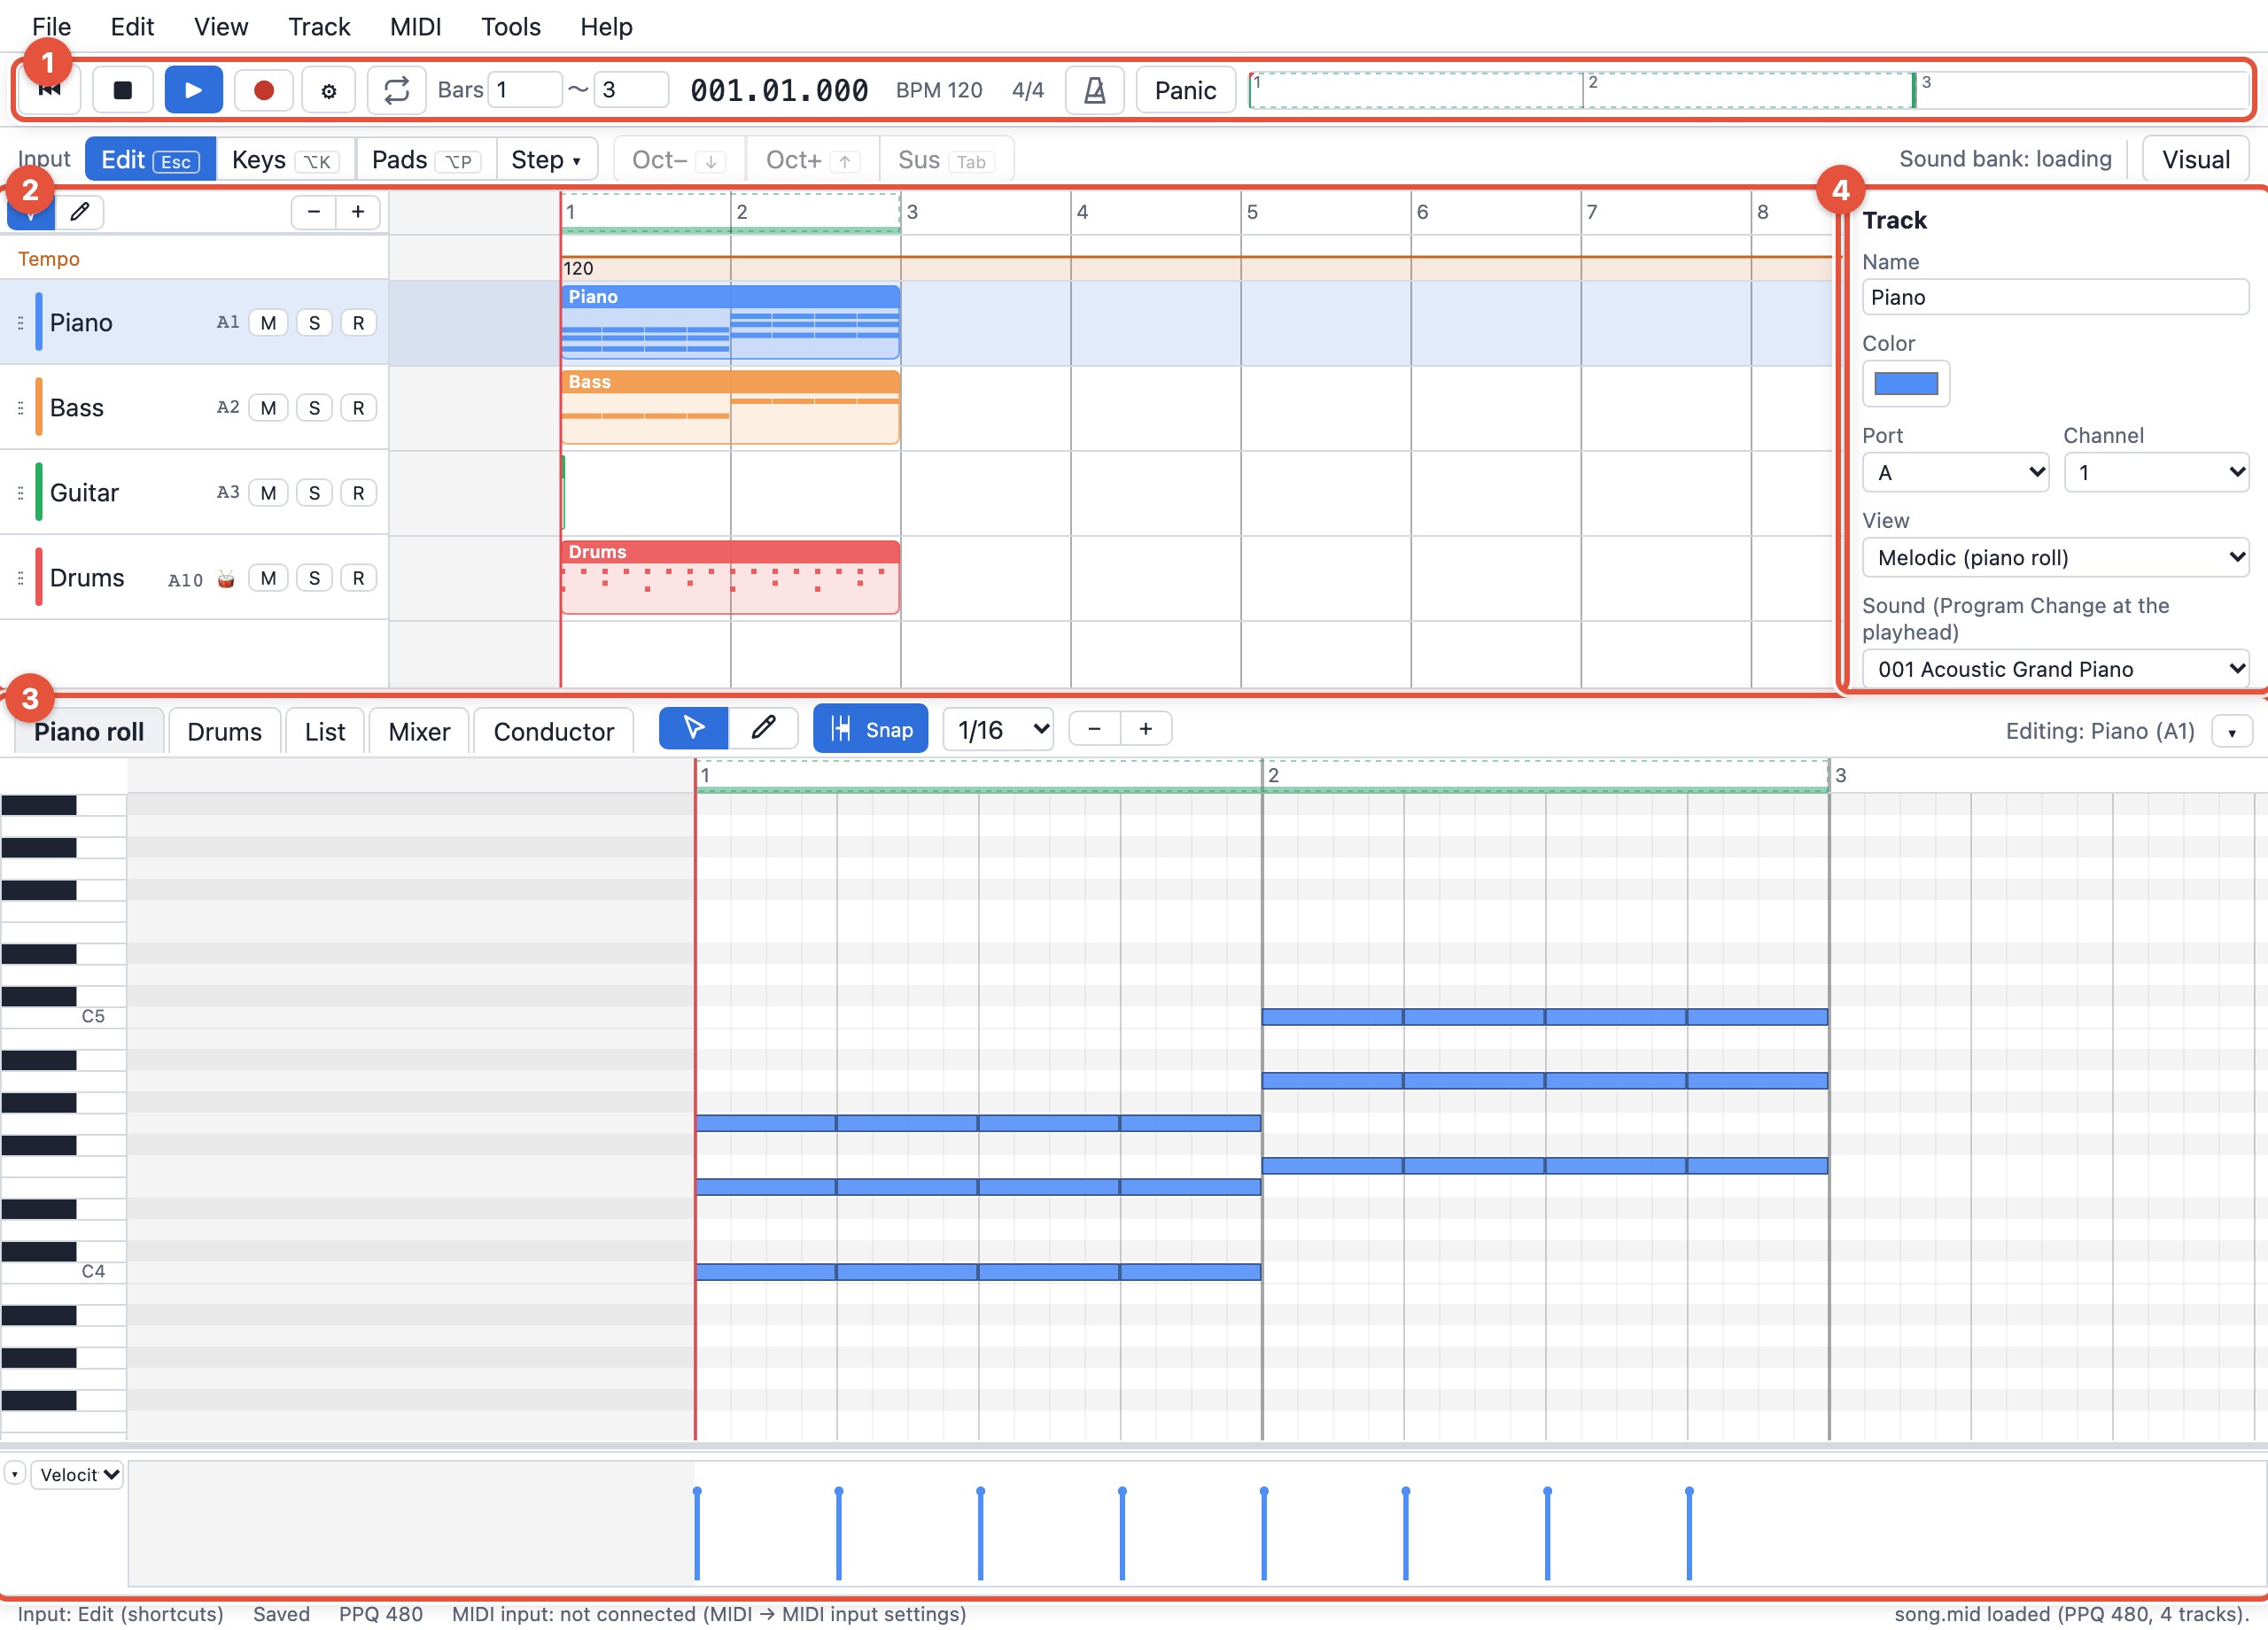
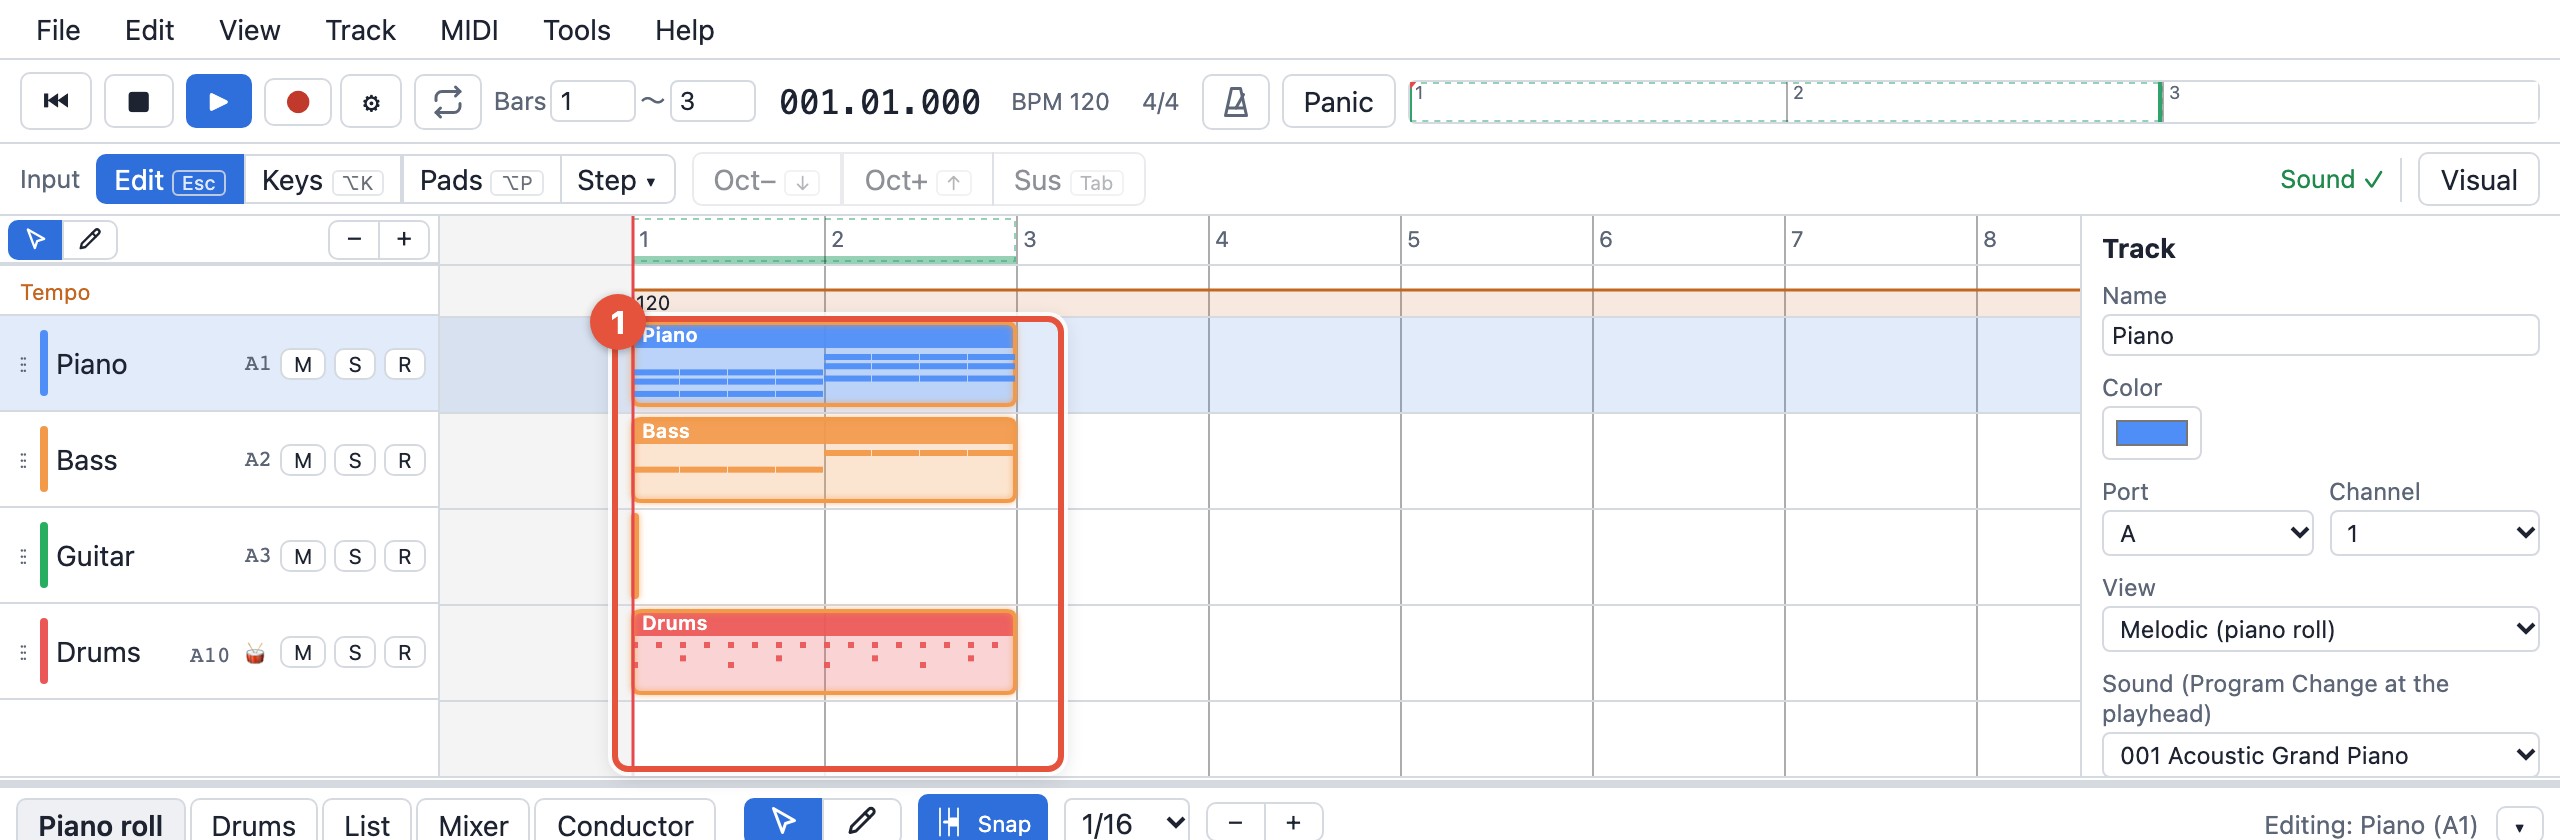
- Transport (top): play, stop, record, loop, current position, tempo, metronome, seek bar.
- Track view (middle): the whole song. Tracks are listed on the left, time runs to the right, and the ranges that hold notes appear as clips.
- Editor (bottom): the contents of the selected track. Tabs switch between piano roll, drums, list, mixer and conductor.
- Inspector (right): the selected track’s name, color, channel and patch.
If you get lost, Esc returns to edit mode and Ctrl+Z undoes.
1. Place the first notes
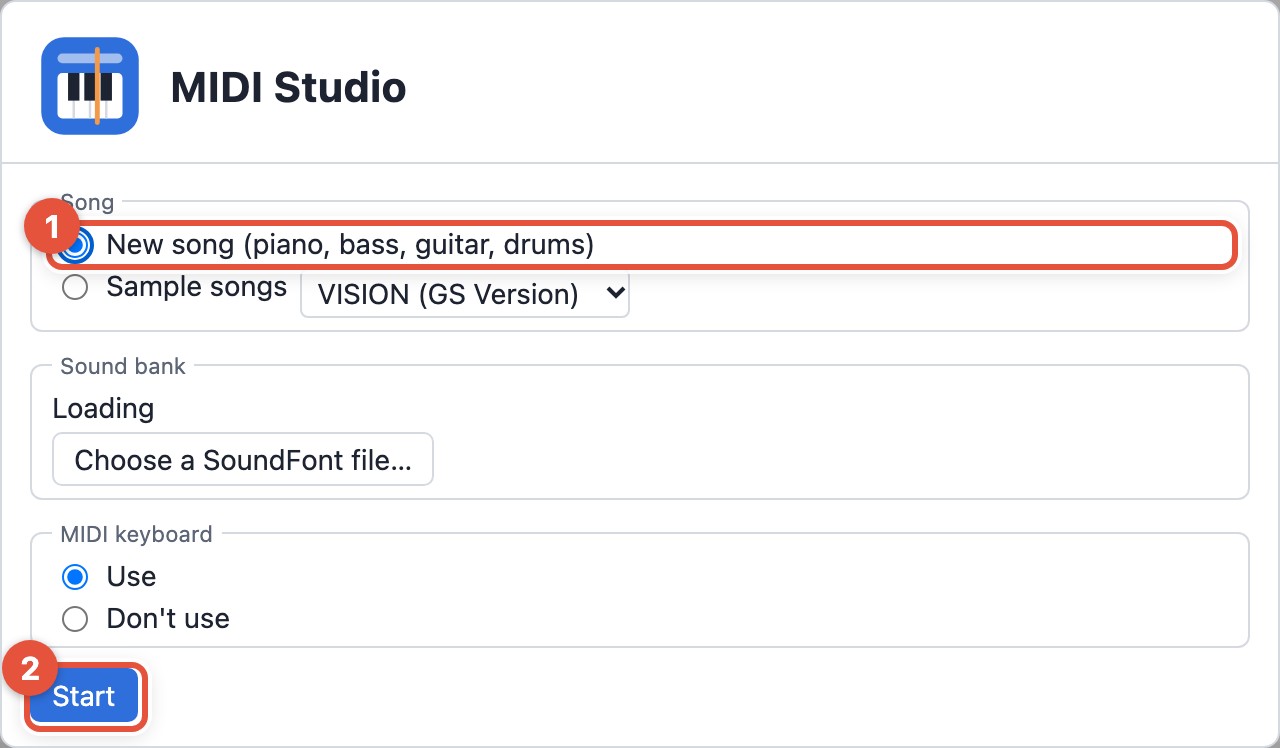
- In the startup dialog choose “New song”, then “Start”. Four tracks appear: piano, bass, guitar and drums. (If you would rather hear a finished song first, pick “Sample songs”.)
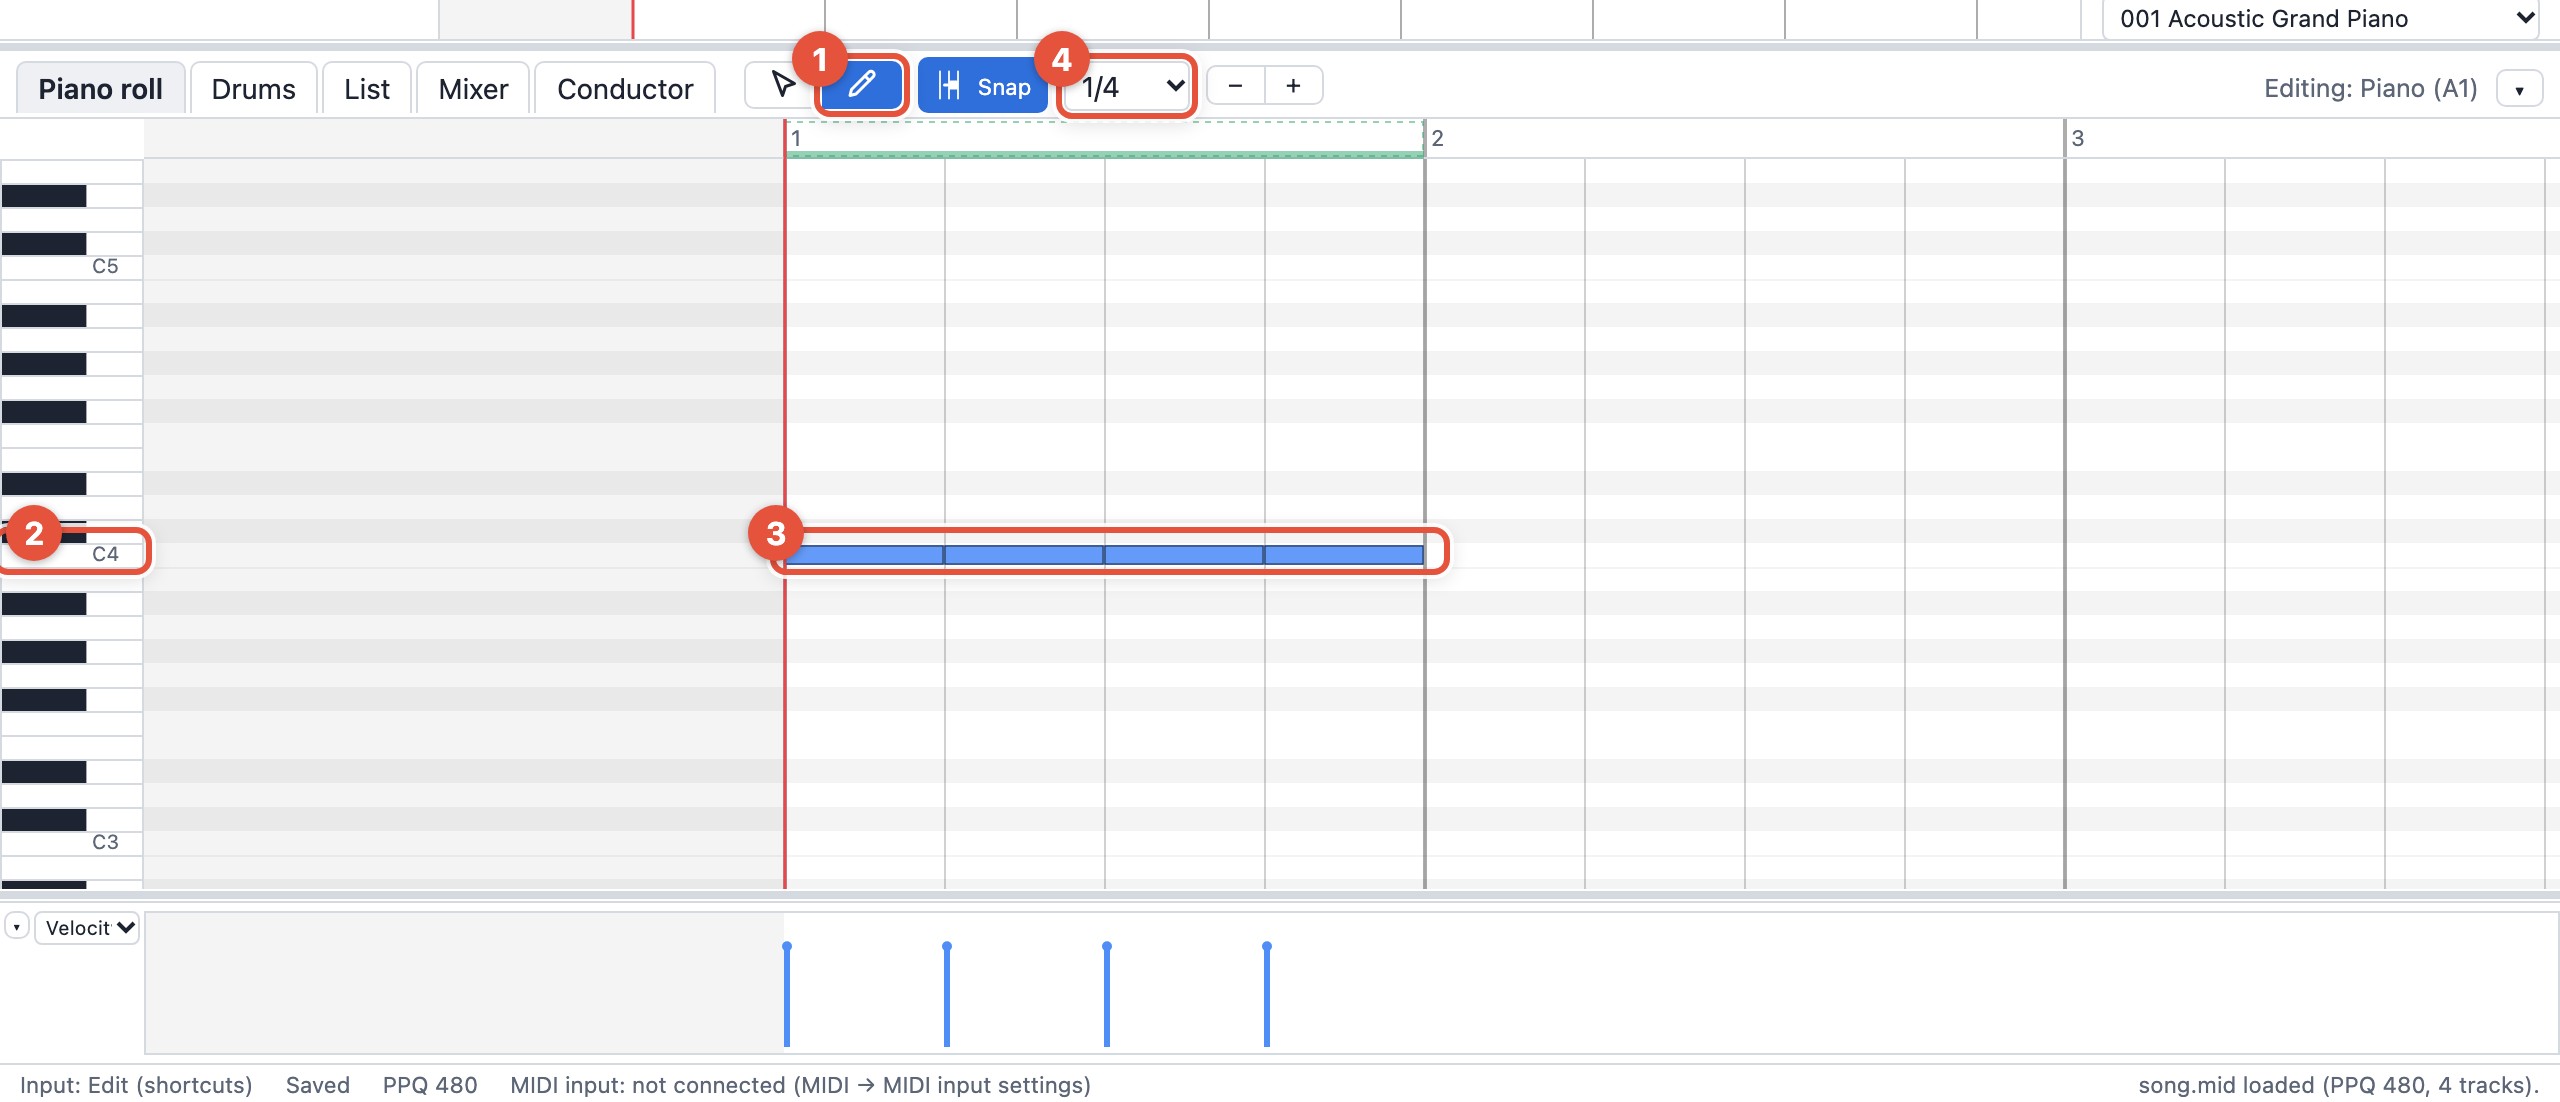
- Click “Piano” in the track view to select it. Make sure the editor below shows the “Piano roll” tab.
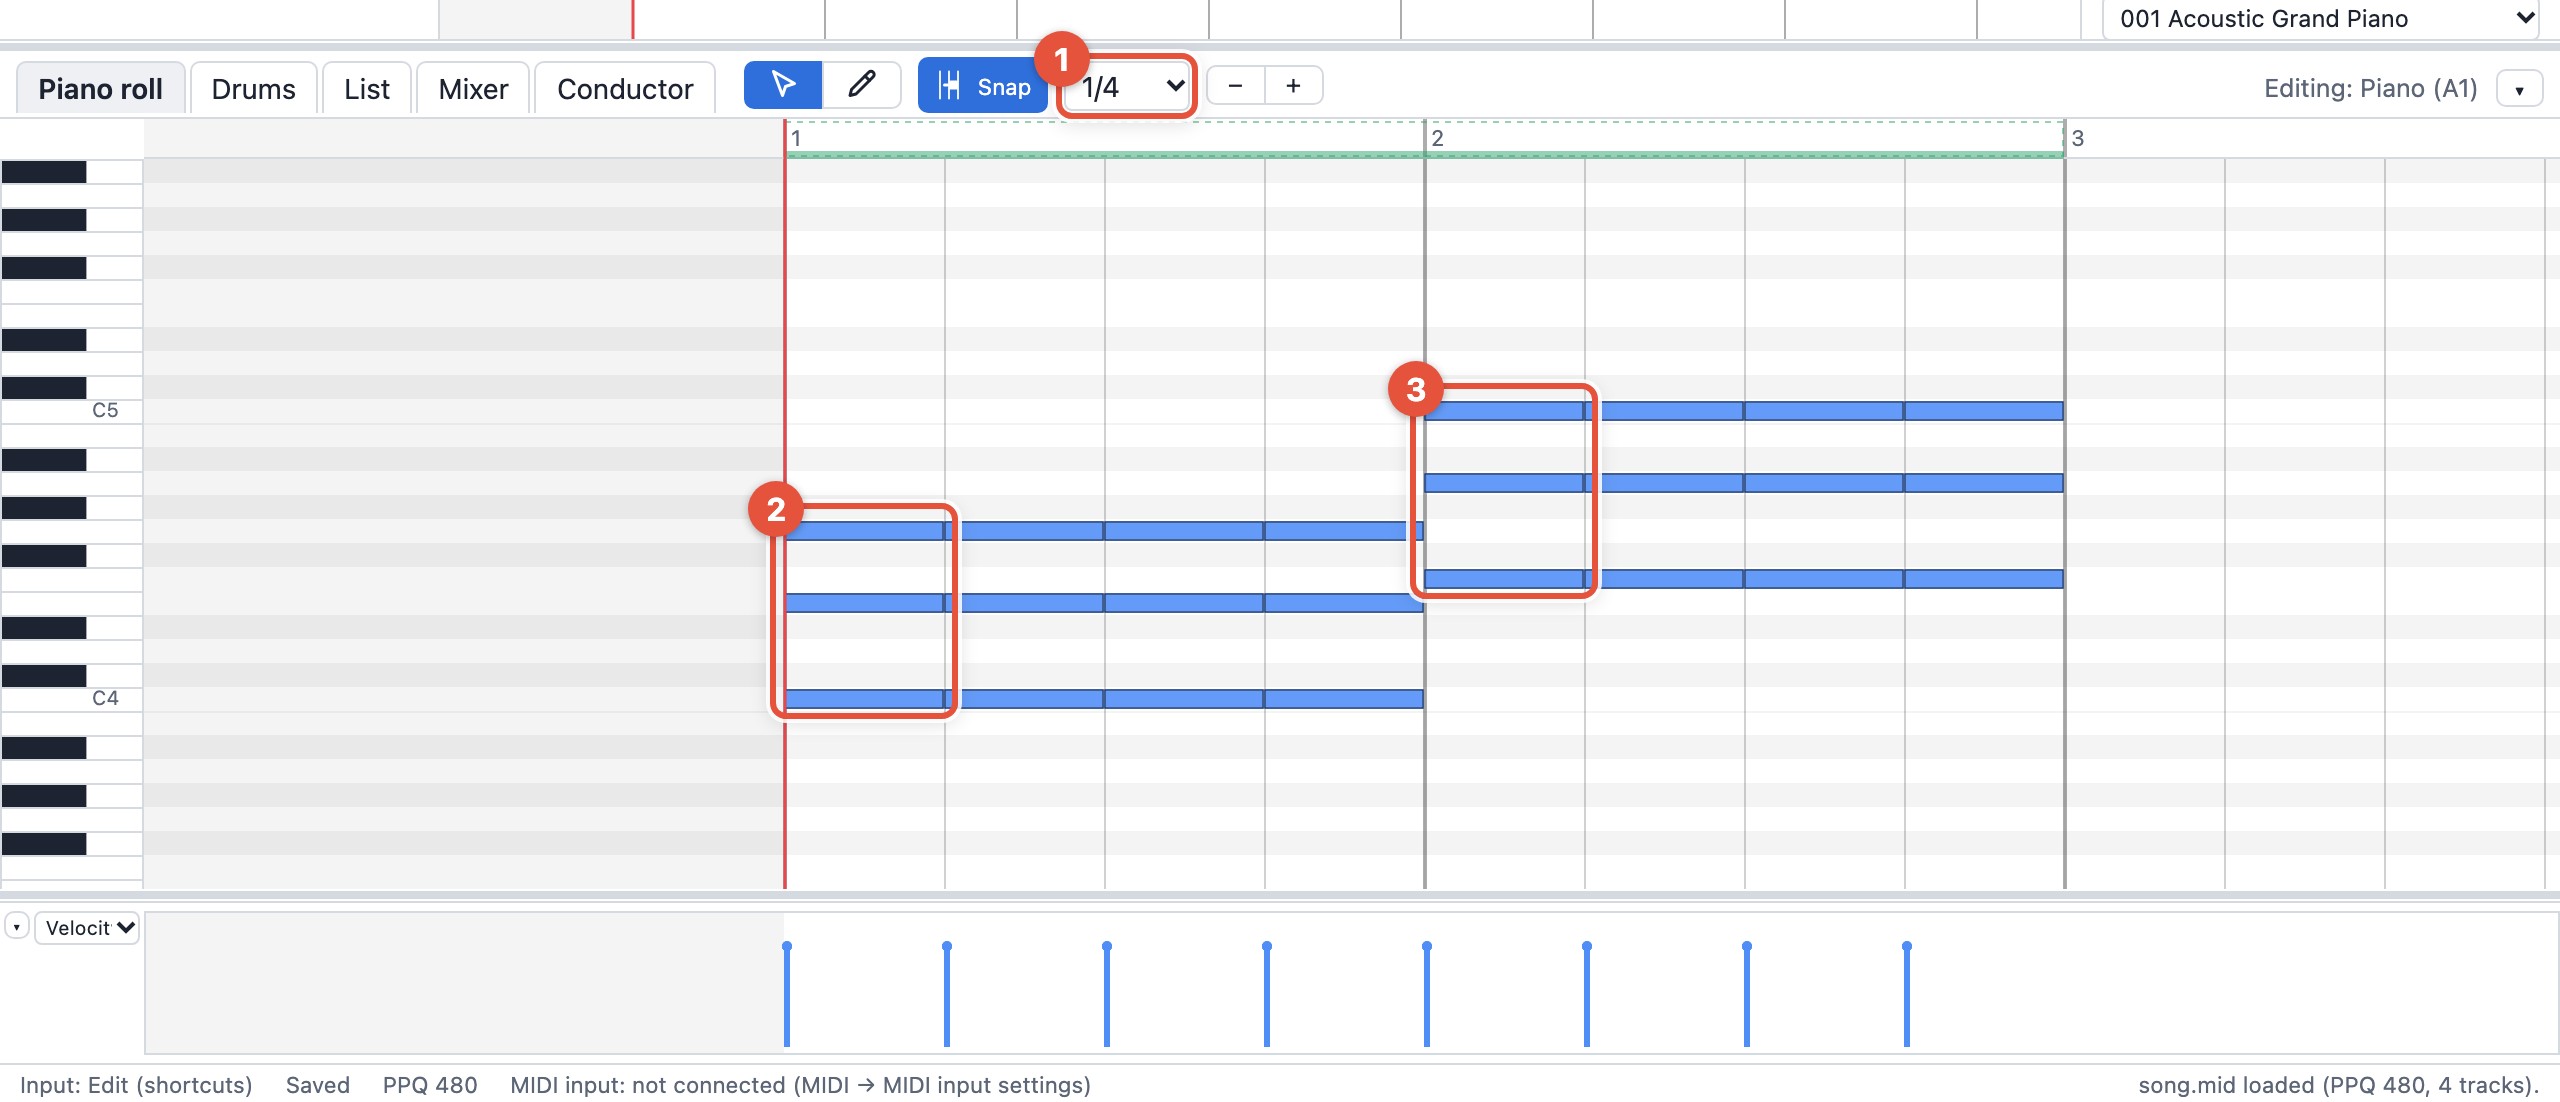
- Set the edit grid above the editor (it starts at “1/16”) to 1/4. A note you place by clicking is as long as this grid.
- Press P for the draw tool, then click at the start of bar 1 in the C4 row (see the keyboard on the left). One quarter note is placed.
- Place three more to the right in the same row, so bar 1 is filled with four quarter notes. (Keeping the button down and dragging makes a note longer; not needed here.)
- Press Space to play. Space again pauses, Enter goes back to the start.
To move a note, press V for the select tool and drag its middle; to delete it, select it and press Delete. Notes snap to the grid as you place them.
2. Add a beat
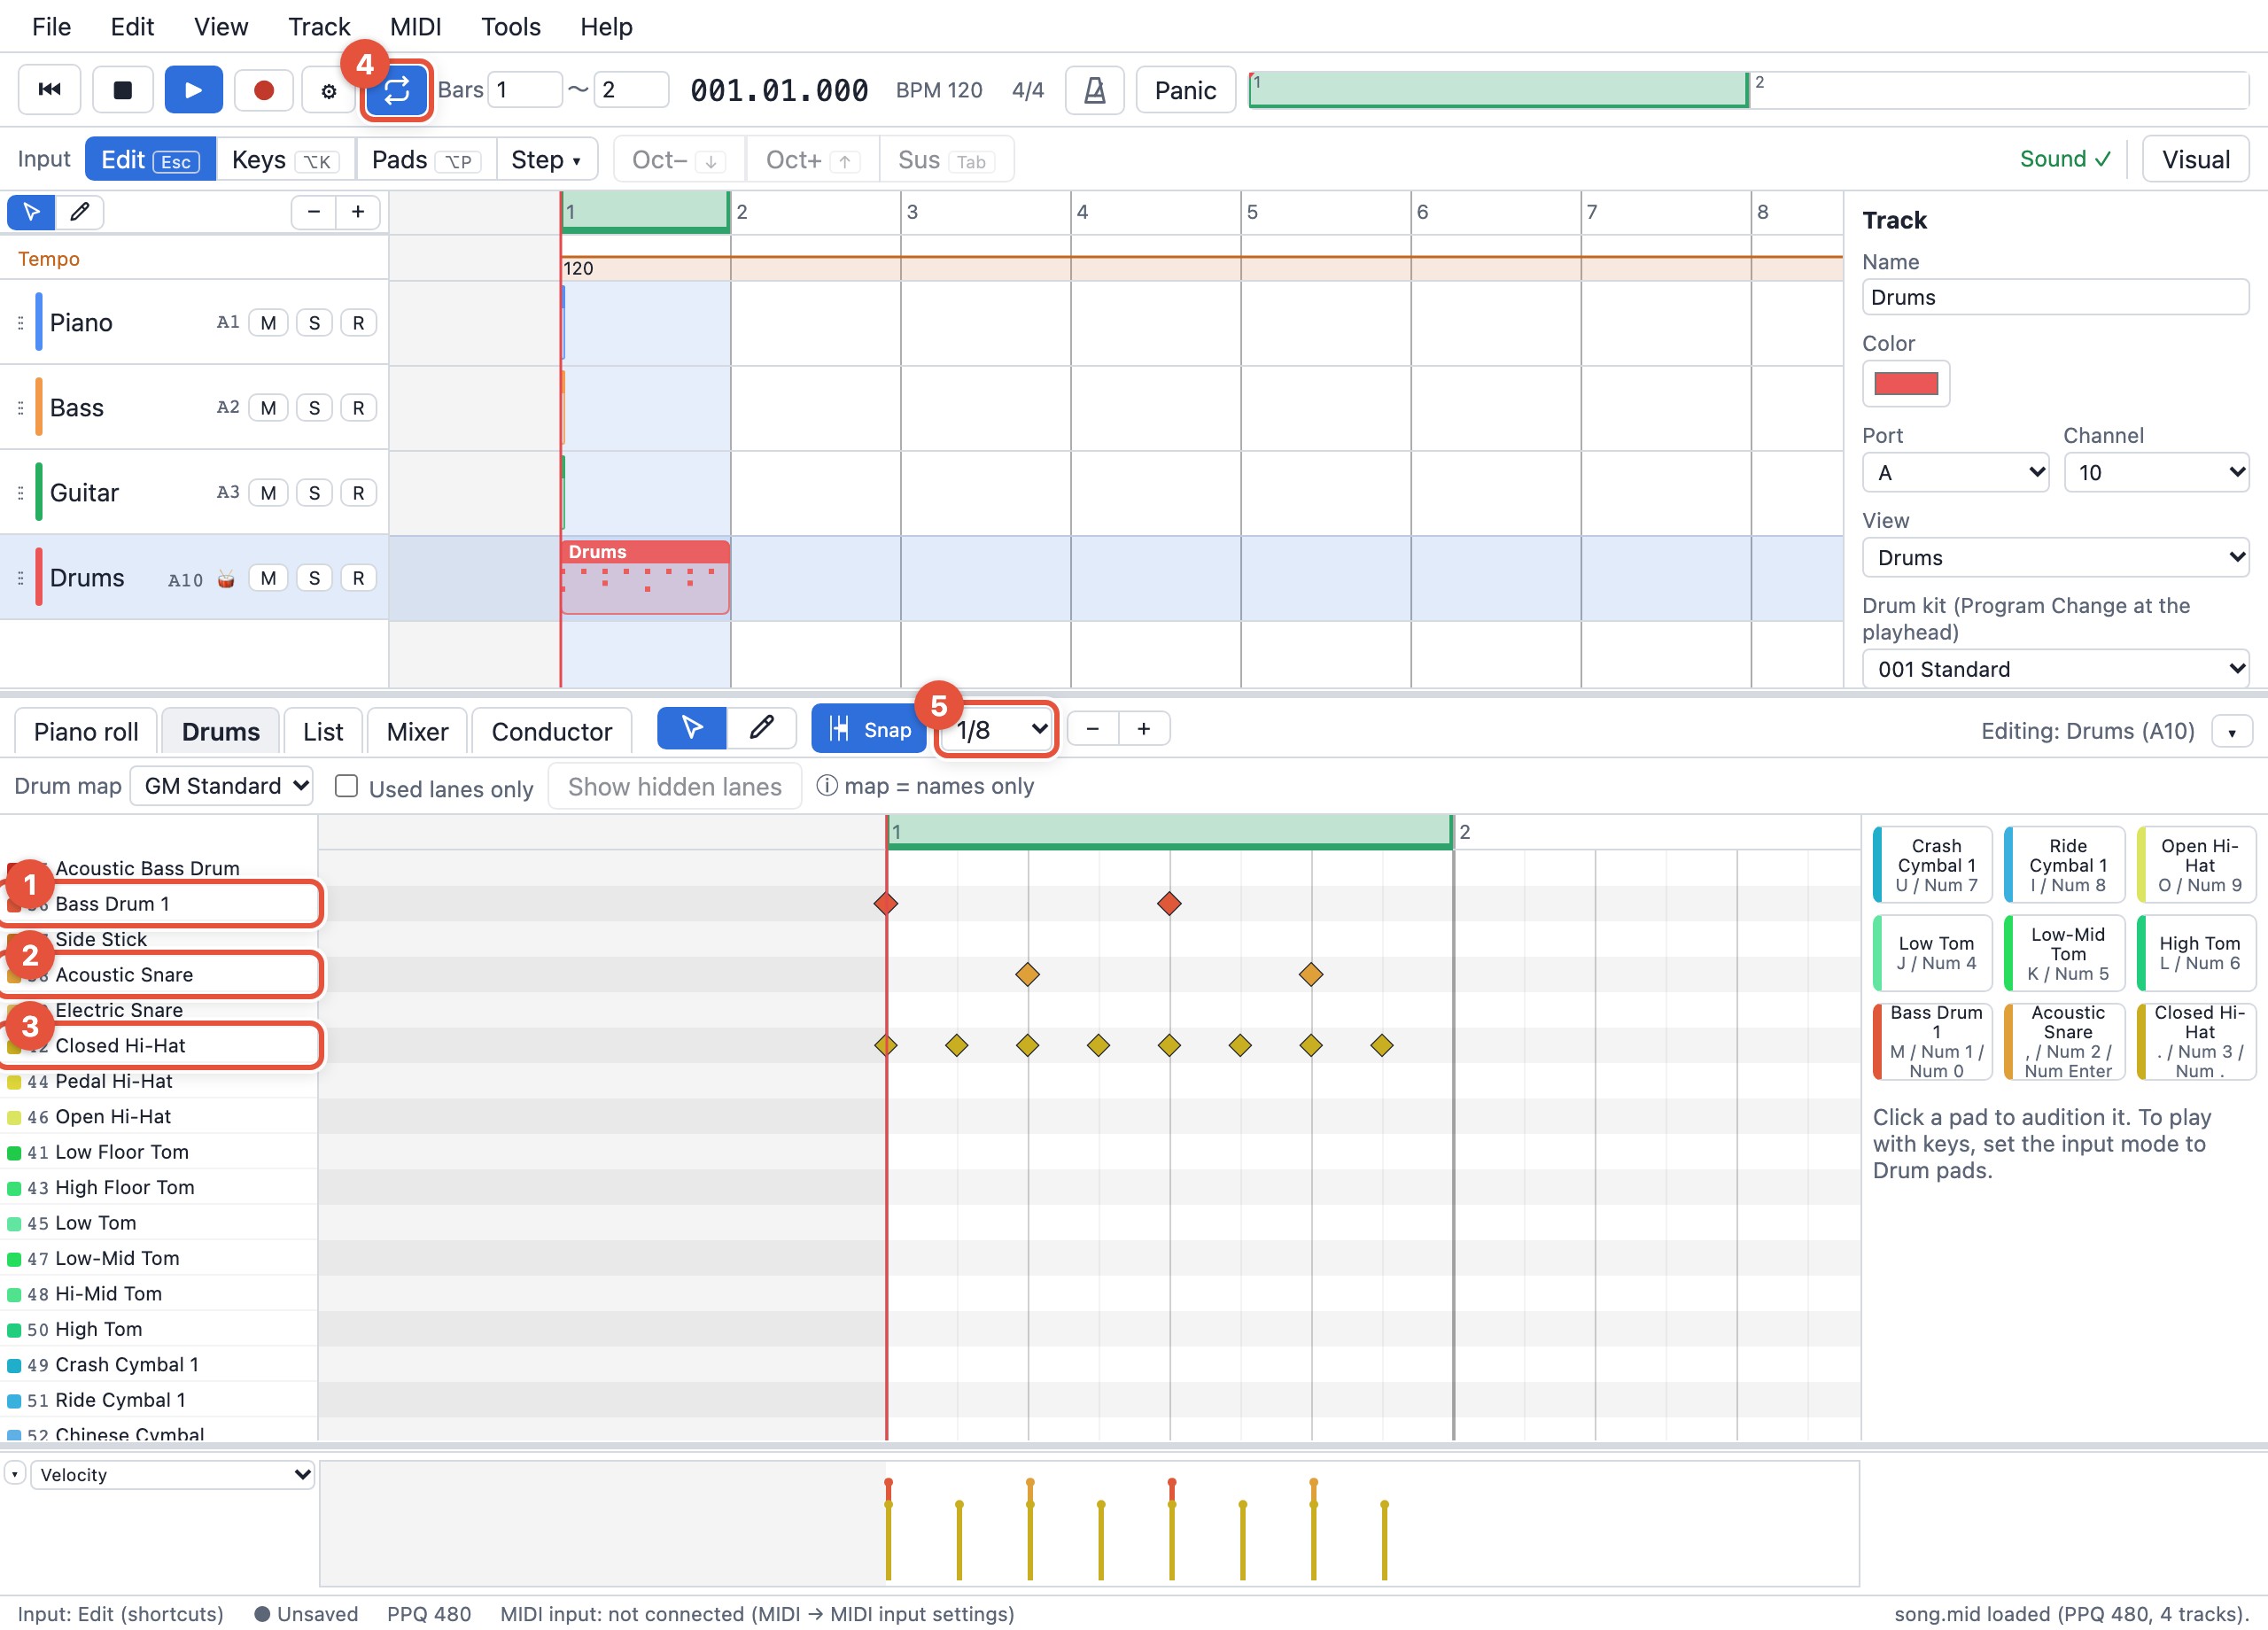
- Select “Drums” in the track view. The editor switches to “Drums”, with one lane per instrument.
- Set the edit grid to 1/8 (the hi-hat goes on eighth notes).
- In the Bass Drum 1 lane click beats 1 and 3; in the Acoustic Snare lane click beats 2 and 4.
- In the Closed Hi-Hat lane click every eighth note (eight per bar).
- Press L to turn the loop on, then Space. Bar 1 repeats. Change the loop range with the “Bars” numbers in the transport or by dragging the ends of the range in the ruler.
On drums, pitch selects the instrument (C1 = bass drum, D1 = snare…). That is the rule of channel 10. Click the pads on the right to hear each one.
3. Bass and chords
- Select “Bass”, set the edit grid back to 1/4, and place four quarter notes in the C2 row of the piano roll (one bar).
- Back on “Piano”, put E4 and G4 on top of each of the four notes from chapter 1 (C4, E4 and G4 on every beat: 12 notes in all). C, E and G together make a C chord.
- Now bar 2. Click the piano roll, press Ctrl+A to select all the notes of bar 1, then Ctrl+D to duplicate them: the same notes appear in bar 2 and stay selected. Press ↑ five times to raise them five semitones: F4, A4, C5 (an F chord).
- The bass works the same way: select “Bass”, click the piano roll, then Ctrl+A → Ctrl+D → ↑ five times, and bar 2 is F2.
- Give the drums two bars as well: select “Drums”, then Ctrl+A → Ctrl+D. The one-bar pattern from chapter 2 now fills bar 2 too (no ↑ here).
- Set the right-hand “Bars” number in the transport to 3 (1 to 3 loops bars 1 and 2). Space. Just going C → F already sounds like a song.
Select notes and Ctrl+C, move the playhead and Ctrl+V to paste; Ctrl+D duplicates right after the selection. ↑↓ moves by a semitone, Shift+↑↓ by an octave.
4. Patches, tempo and volume
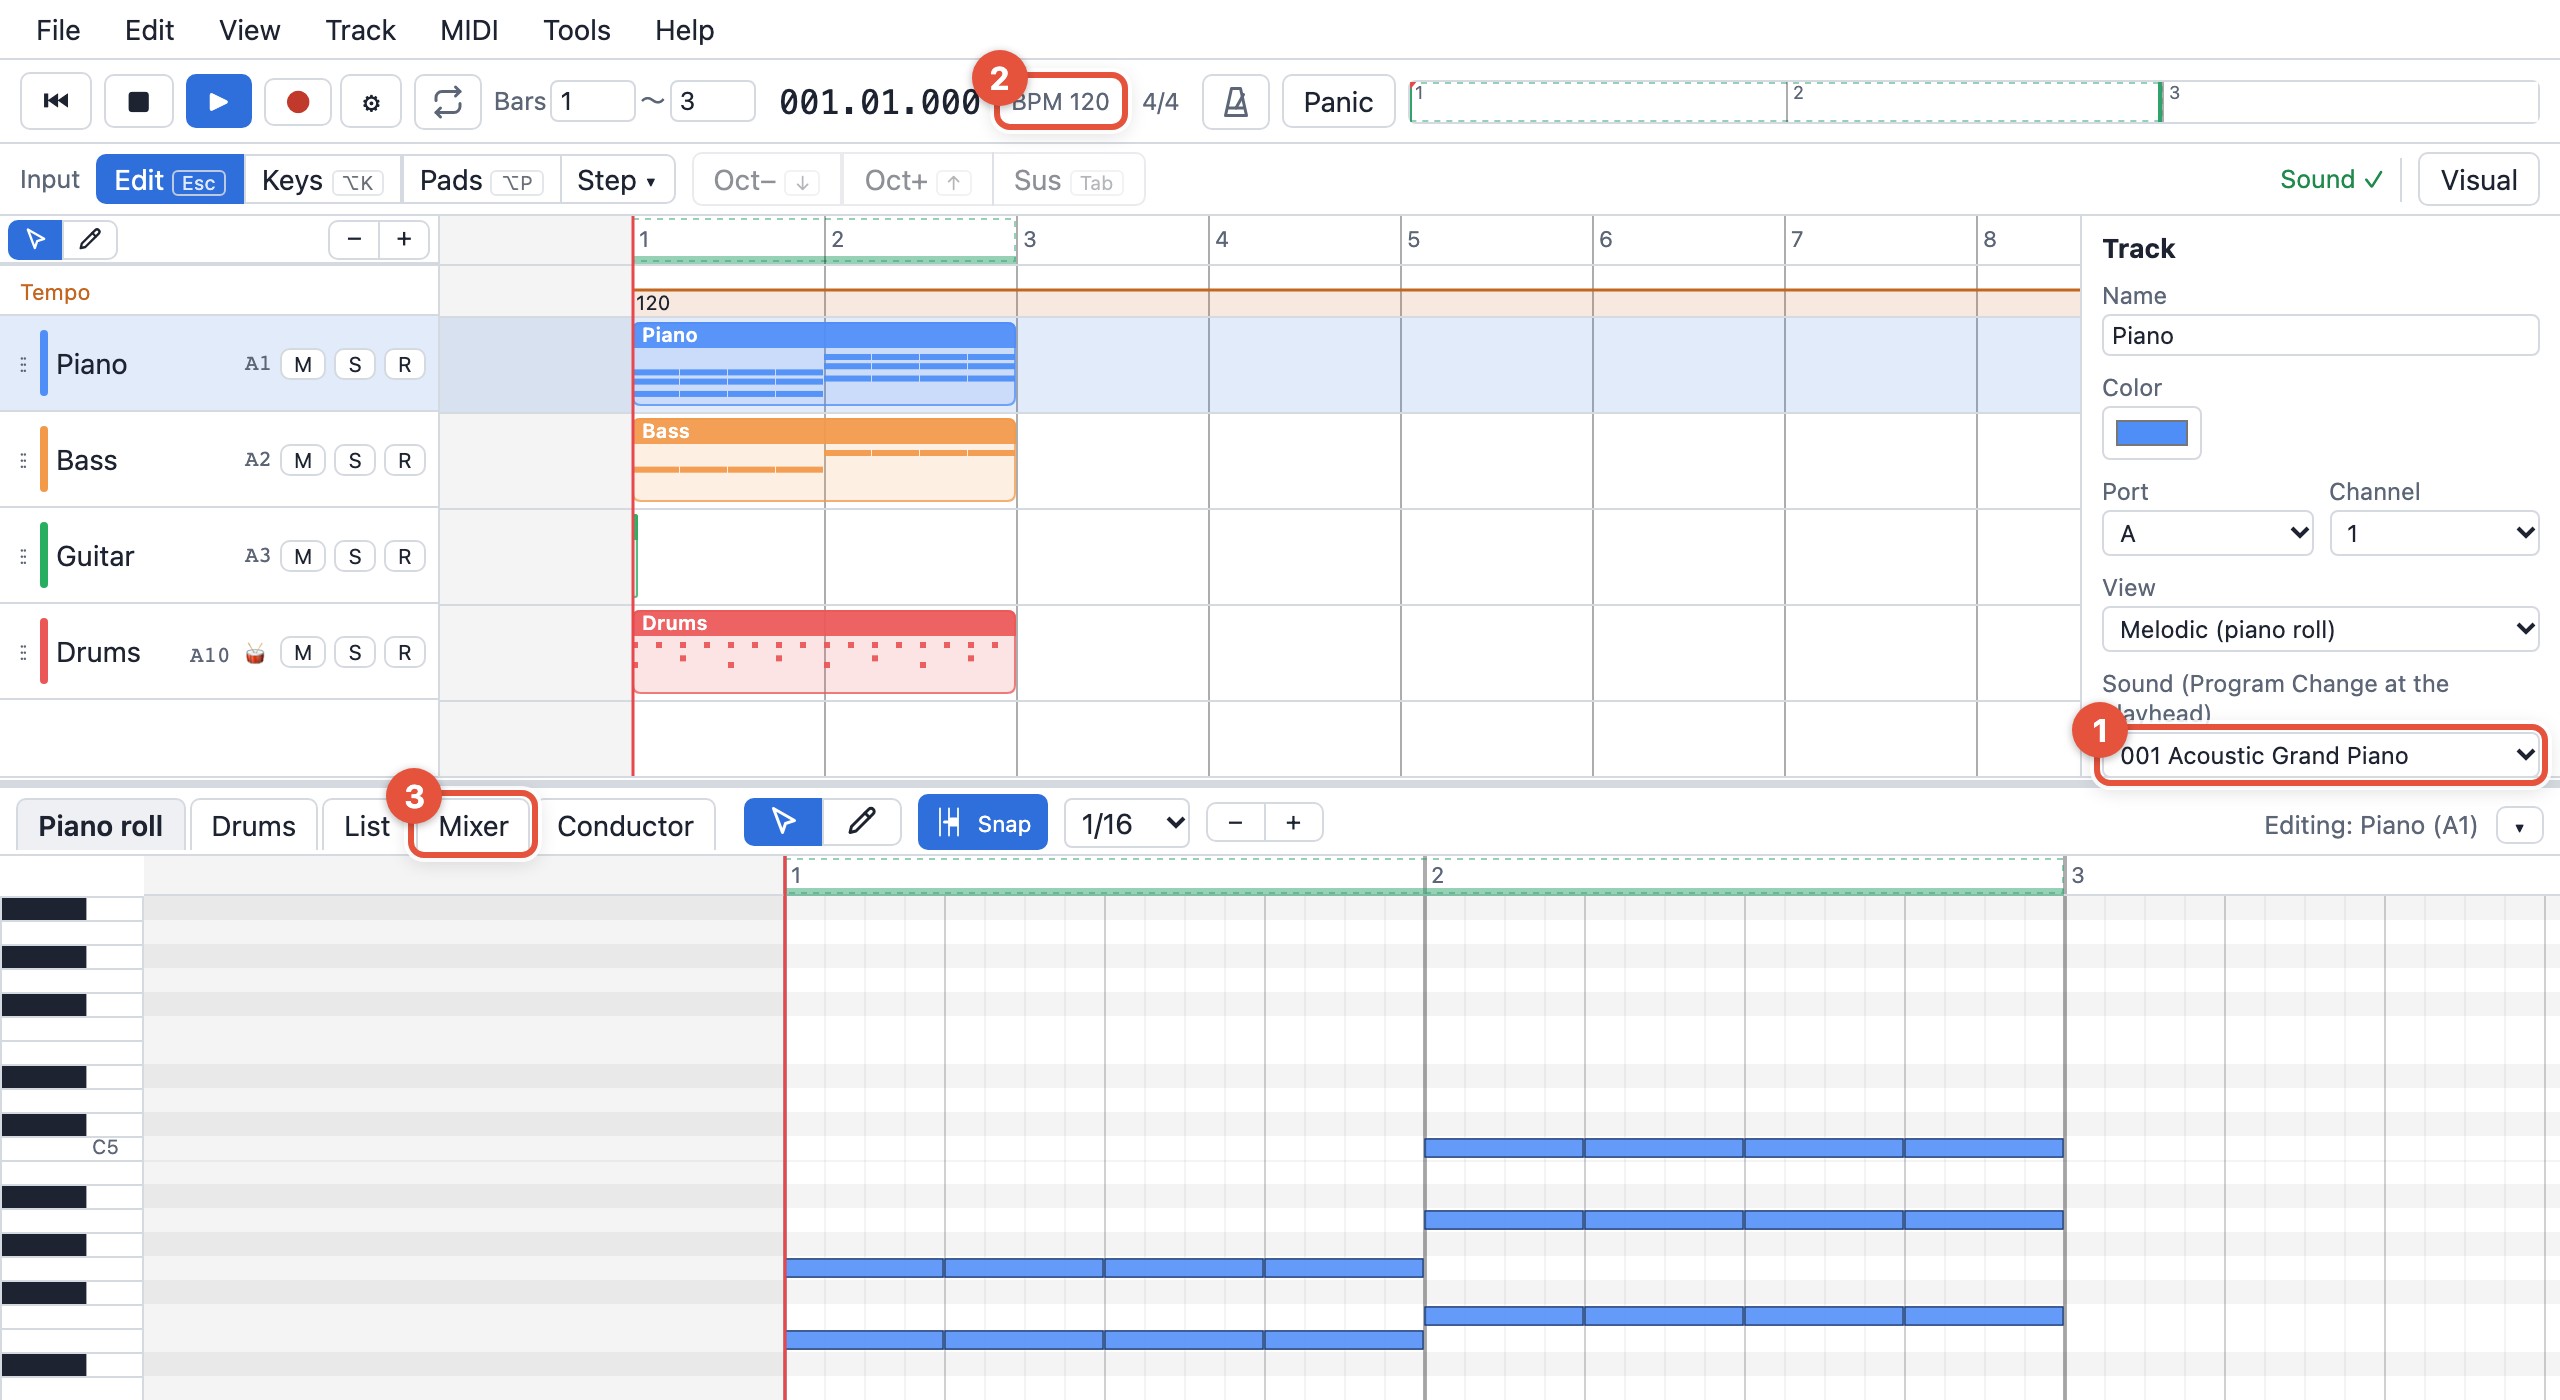
- Patch: select a track and pick one under “Patch” in the inspector on the right. Try Electric Piano 1 for the piano and String Ensemble 1 for the guitar to change the mood (the guitar has no notes yet, so you will not hear it; pick it now for later).
- Tempo: click the BPM in the transport and type a number. 120 is average, 90 relaxed, 140 brisk. To change it in the middle of the song, use the conductor.
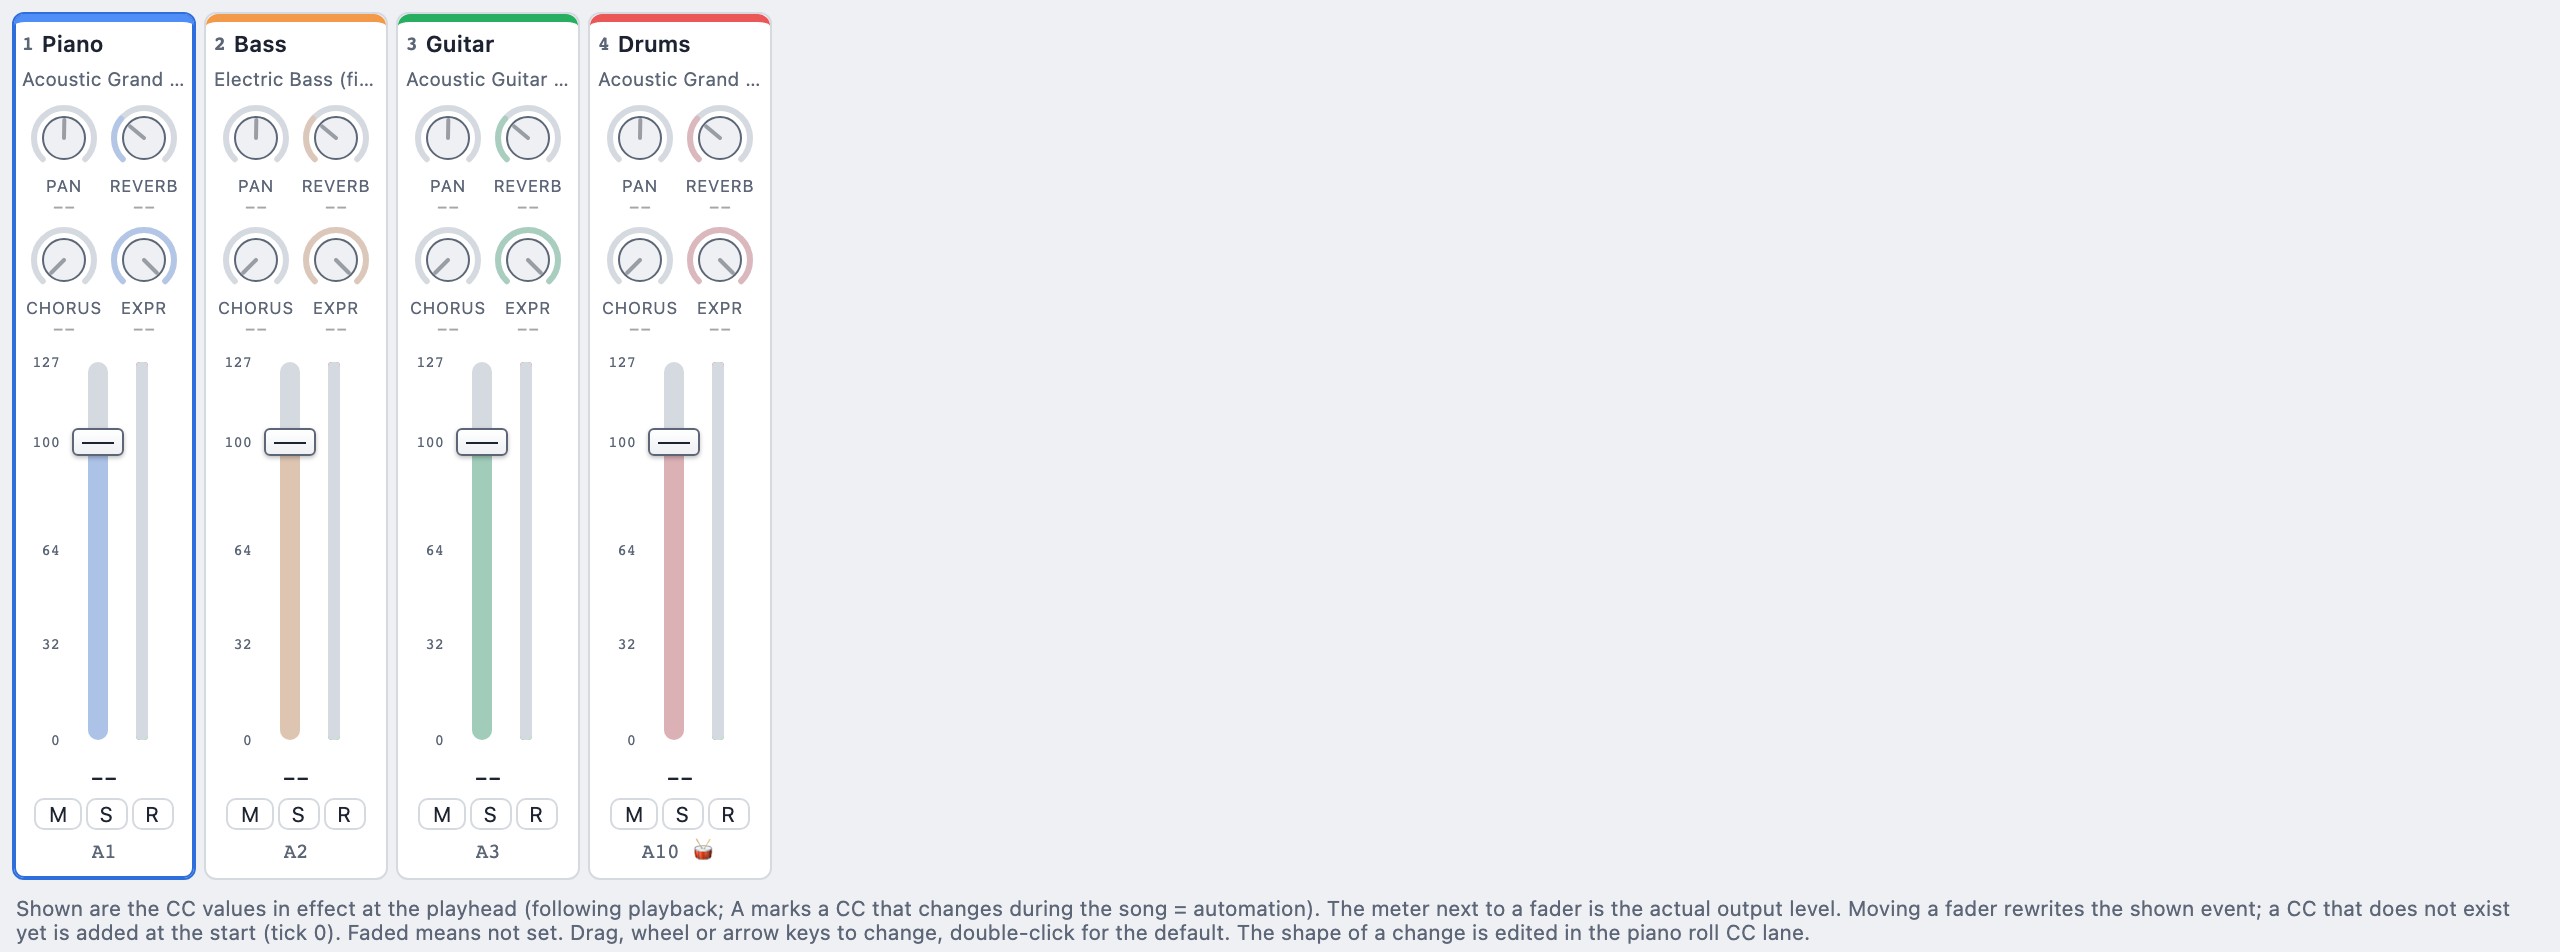
- Volume and stereo position: move Volume and Pan on the “Mixer” tab. You can do this while the song plays.
The patch is stored as a Program Change at the start of the song and the volume as a CC, and both go into the MIDI file.
5. Play it in
Besides clicking notes in, you can turn the keyboard into an instrument and play.
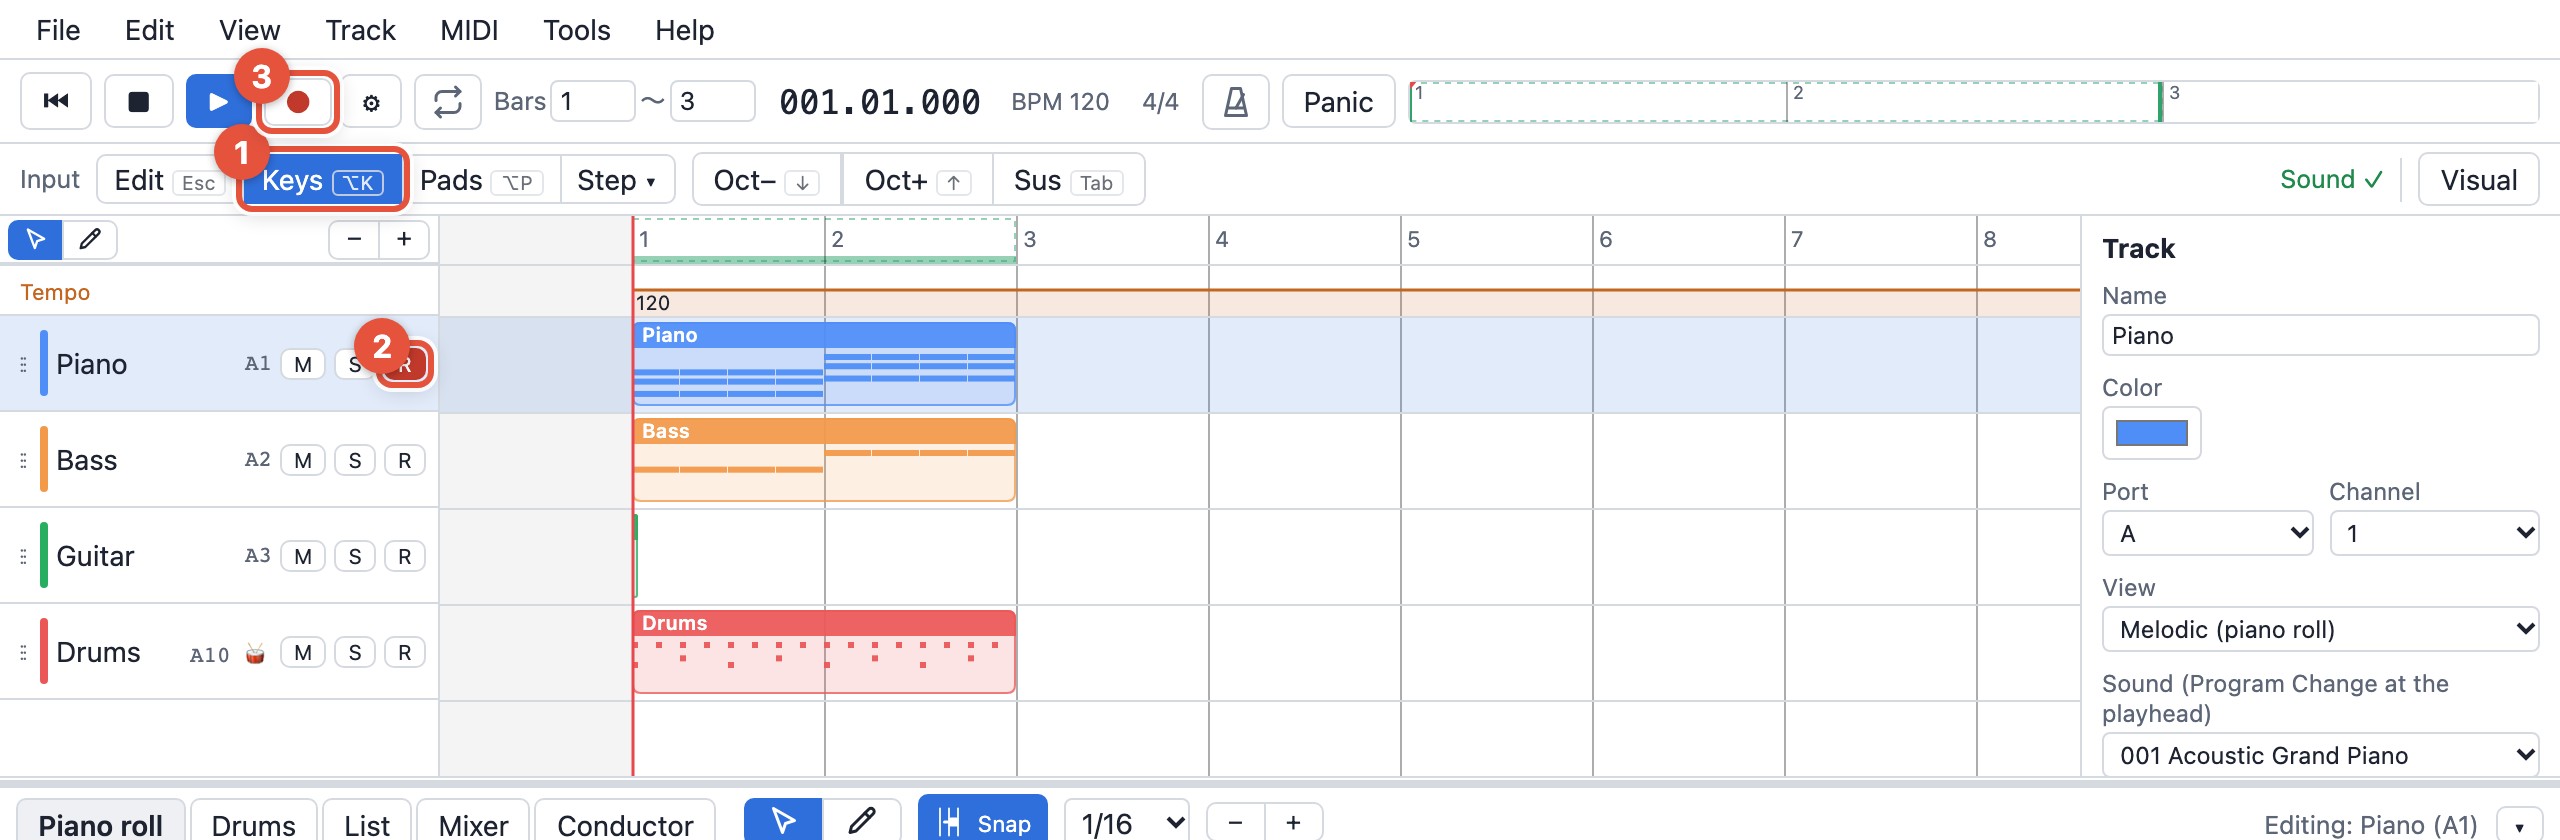
- Press Alt+K to switch the input mode to “Keys”. The bottom row Z–M is C4–B4 and the top row Q–I is one octave higher. ↑↓ changes the octave.
- Press R (record-arm) on “Piano”, then R to start recording. After a one-bar count-in, what you play goes straight in. R stops.
- If the timing is off, select the notes and press Q. They line up with the edit grid (quantize).
- Press Esc to return to edit mode. While in Keys mode, the single-letter shortcuts play notes instead, so keep that in mind.
With a MIDI keyboard, choosing “Use” in the startup dialog is all it takes. For drums, use the “Pads” mode (Alt+R).
6. Shape it into a song
- You have two bars; repeat them four times to get eight. In the track view, drag from empty space with no clip (below the drums, say) up and to the left to select the piano, bass and drum clips together (the guitar has no notes yet, so no clip). Ctrl+D duplicates them right after themselves. The copies stay selected, so press Ctrl+D twice more for eight bars. A single clip can also be duplicated with Alt++drag.
- Change notes only where you want variation. Changing velocities adds dynamics (drag in the Velocity lane under the piano roll).
- If it feels too mechanical, select the notes and use Edit › Notes › Humanize…. Positions and velocities get a little looser.
- Markers (right-click the marker row in the track view, or use the conductor) named Intro / A / B keep you oriented.
You now have an eight-bar song: C and F chords alternating four times.
7. Save and export
- Ctrl+S saves to the browser. The next time you open the app, the startup dialog offers to continue where you left off.
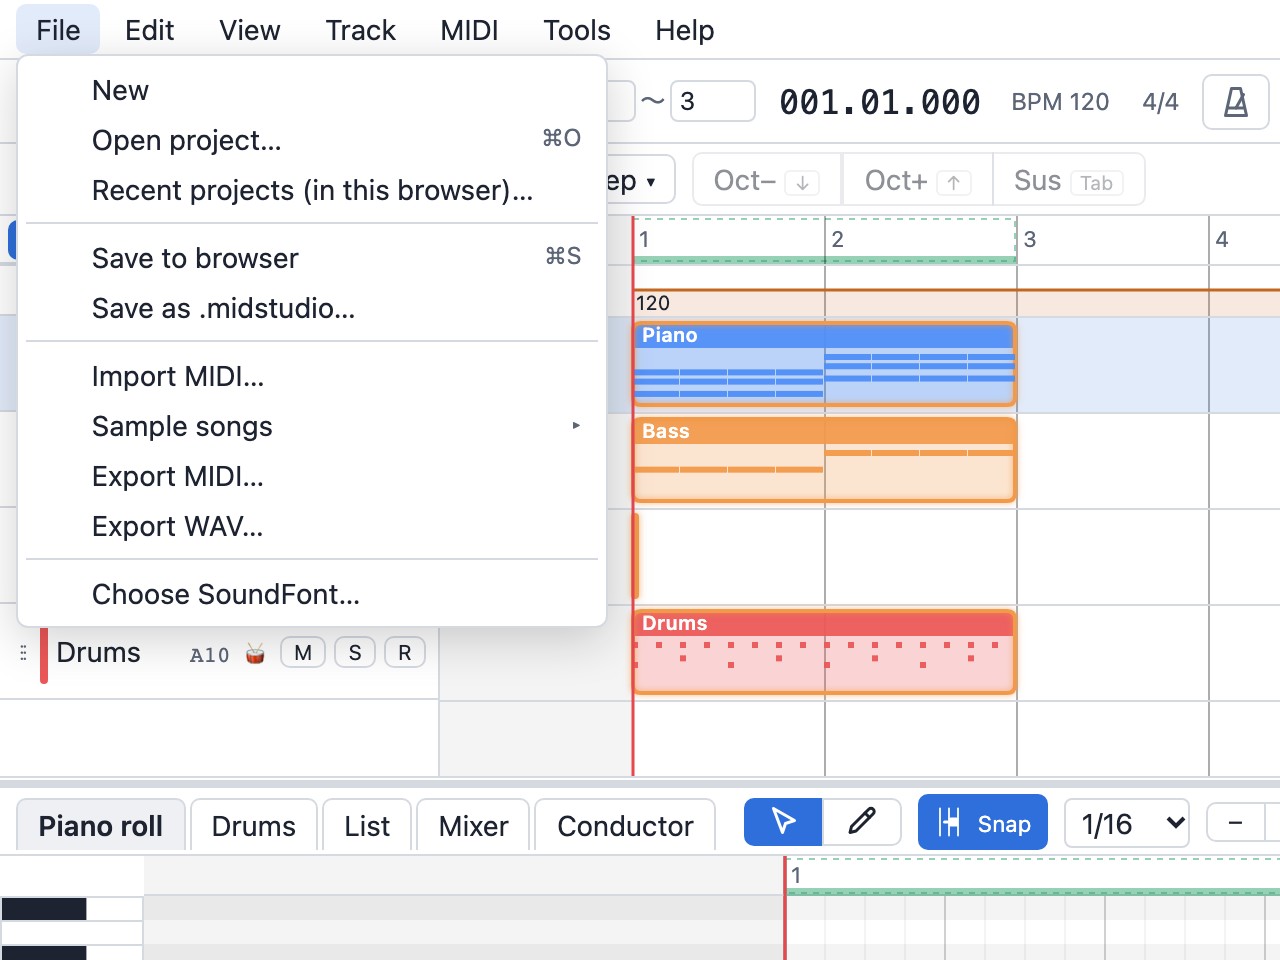
- To keep the song as a file, use File › Save as .midstudio…. To pass it to other software, Export MIDI… (.mid).
- To let people hear it as audio, Export WAV….
Data inside the browser disappears together with the browser’s site data when that is cleared. Keep important songs as files too.
Where to go next
- Open VISION or Merry X'mas For You! from File › Sample songs to see how a song with more than 20 tracks is put together. Your own .mid files open with File › Import MIDI….
- For exact numeric entry use the “List” tab: Recomposer-style MEAS / STEP / NOTE / ST / GT / VEL, entirely from the PC keyboard.
- Visual mode (T) lets you watch every track while the song plays.
- The details of every operation are in the help (F1); the GS SysEx support is summarised under “GM / GS” there.